


在本指南中,我们将学习如何在 Ubuntu 22.04 上安装和设置 OpenVPN 服务器。
OpenVPN是一款功能强大且高度灵活的开源 VPN 软件,它使用 OpenSSL 库的所有加密、身份验证和认证功能,通过单个 UDP 或 TCP 端口安全地隧道传输 IP 网络。
它有助于在公共网络上扩展专用网络,访问远程站点,建立安全的点对点连接,同时保持专用网络中实现的安全性。
今天就让我们来搭建并配置它,我以我的vps服务器系统是:Ubuntu-22.04系统。👇


开始下面的教程:
在 Ubuntu 上安装和配置 OpenVPN 服务器
运行系统更新,执行命令:👇
apt update
apt upgrade -y
安装 OpenVPN Ubuntu 22.04:👇
apt install openvpn
安装openvpn,现在我们需要配置 openvpn 服务器。
OpenVPN 服务器配置
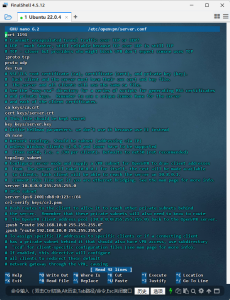
在编辑器中打开文件:以超级用户身份打开编辑 OpenVPN 服务器配置文件:
sudo nano /etc/openvpn/server.conf
将内容粘贴保存:👇
port 1194
# transmit encapsulated tunnel traffic over TCP or UDP?
# UDP – much faster, still reliable because TCP over UDP is still TCP
# TCP – slower but providers who might block VPN don’t expect somone uses TCP
;proto tcp
proto udp
dev tun
# SSL/TLS root certificate (ca), certificate (cert), and private key (key).
# Each client and the server must have their own cert and key file.
# The server and all clients will use the same ca file.
# See the “easy-rsa” directory for a series of scripts for generating RSA certificates
# and private keys. Remember to use a unique Common Name for the server
# and each of the client certificates.
ca keys/ca.crt
cert keys/server.crt
# This file should be kept secret
key keys/server.key
# Diffie hellman parameters. we don’t use it because use EC instead
dh none
# Network topology. Should be subnet (addressing via IP)
# unless Windows clients v2.0.9 and lower have to be supported
# (then net30, i.e. a /30 per client). Defaults to net30 (not recommended)
topology subnet
# Configure server mode and supply a VPN subnet for OpenVPN to draw client addresses
# from. The server will take 10.8.0.1 for itself, the rest will be made available
# to clients. Each client will be able to reach the server on 10.8.0.1.
# Comment this line out if you are ethernet bridging. See the man page for more info.
server 10.8.0.0 255.255.255.0
# IPv6 subnet
server-ipv6 2001:db8:0:123::/64
crl-verify keys/crl.pem
# Push routes to the client to allow it to reach other private subnets behind
# the server. Remember that these private subnets will also need to know to route
# the OpenVPN client address pool (10.8.0.0/255.255.255.0) back to the OpenVPN server.
;push “route 192.168.10.0 255.255.255.0”
;push “route 192.168.20.0 255.255.255.0”
# To assign specific IP addresses to specific clients or if a connecting client
# has a private subnet behind it that should also have VPN access, use subdirectory
# “ccd” for client-specific configuration files (see man page for more info).
# If enabled, this directive will configure
# all clients to redirect their default
# network gateway through the VPN, causing
# all IP traffic such as web browsing and
# and DNS lookups to go through the VPN
# (The OpenVPN server machine may need to NAT
# or bridge the TUN/TAP interface to the internet
# in order for this to work properly).
push “redirect-gateway ipv6 def1 bypass-dhcp”
# The addresses below refer to the public DNS servers
push “dhcp-option DNS 8.8.8.8”
push “dhcp-option DNS 8.8.4.4”
# The keepalive directive causes ping-like messages to be sent back and forth over
# the link so that each side knows when the other side has gone down.
# Ping every 10 seconds, assume that remote peer is down if no ping received during
# a 120 second time period.
keepalive 10 120
# For extra security beyond that provided by SSL/TLS, create an “HMAC firewall”
# to help block DoS attacks and UDP port flooding. Generate with:
# openvpn –genkey –secret ta.key
#
# The server and each client must have a copy of this key.
# The second parameter should be ‘0’ on the server and ‘1’ on the clients.
;tls-auth ta.key 0 # This file is secret
tls-crypt keys/ta.key
# Select a cryptographic cipher. This config item must be same in client config
cipher BF-CBC # Blowfish (default)
;cipher DES-EDE3-CBC # Triple-DES
;cipher AES-256-GCM # AES 256 – for openvpn version 2.4+
auth SHA256
# Enable compression on the VPN link. If you enable it here, you must also
# enable it in the client config file.
comp-lzo
# It’s a good idea to reduce the OpenVPN daemon’s privileges after initialization.
# You can comment this out on Windows systems.
user nobody
group nogroup
# The persist options will try to avoid accessing certain resources on restart
# that may no longer be accessible because of the privilege downgrade.
persist-key
persist-tun
# Output a short status file showing current connections, truncated
# and rewritten every minute.
status /tmp/openvpn-status.log 3
# Set the appropriate level of log file verbosity.
#
# 0 is silent, except for fatal errors
# 4 is reasonable for general usage
# 5 and 6 can help to debug connection problems
# 9 is extremely verbose
verb 3
tun-mtu 1500
mssfix 1300
在 Ubuntu 上安装 Easy-RSA CA Utility 22.04
 添加 EasyRSA 并生成服务器密钥,安装简单的 RSA:👇
sudo apt install easy-rsa
将 RSA 安装到 /usr/share,我们需要将其复制到 openvpn dir:
cd /etc/openvpn/
sudo cp -r /usr/share/easy-rsa/ .
现在让我们开始密钥生成:
cd /etc/openvpn/easy-rsa

sudo cp vars.example vars

sudo nano vars
找到set_vars部分,该部分以:
set_var EASYRSA_REQ_COUNTRY
set_var EASYRSA_ALGO "ec"
set_var EASYRSA_DIGEST "sha512"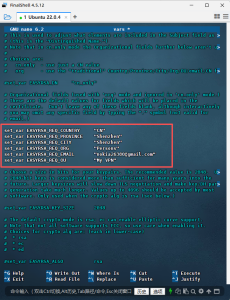
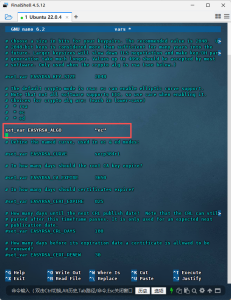
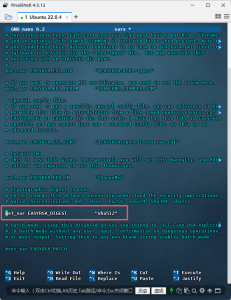
修改后保存并退出!
 Init PKI 删除 pki 文件夹以及之前在那里创建的所有内容:初始化 PKI👇
sudo ./easyrsa init-pki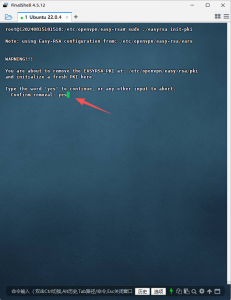
生成pki/ca.crt:👇
sudo ./easyrsa build-ca nopass
[Easy-RSA CA]:默认回车
注释: nopass禁用ca.crt文件加密:证书颁发机构 (ca.crt) 用于对其他证书进行签名并使其成为权威证书。从理论上讲,CA 可以在与你的 VPN 服务器完全不同的主机上生成(因此在不同的 PKI 环境中),但是稍后,你应该向 CA 主机提供.req文件,运行特殊命令以导入它们“./easyrsa import-req copied_server.req server”并在那里签署证书。但是,在此之后,你仍然需要将ca.crt传递回 openvpn 服务器,以便 openvpn 能够验证它们是否由 CA 提供签名。在这种情况下,建议删除 build-ca 命令中的 nopass
接下来生成pki/server.key + reqs/server.req:👇
sudo ./easyrsa gen-req server nopass
每次要求确认时默认按回车键。
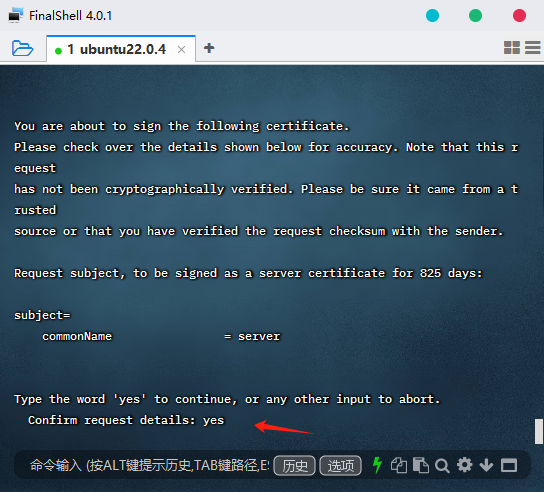
对服务器证书进行签名:输入yes回车👇
sudo ./easyrsa sign-req server server
接下来现在将签名的服务器密钥和 CA 复制到新密钥目录:👇
sudo mkdir /etc/openvpn/keys

sudo cp pki/private/server.key /etc/openvpn/keys/

sudo cp pki/issued/server.crt /etc/openvpn/keys/

sudo cp pki/ca.crt /etc/openvpn/keys/
下面同时生成 TA:👇
sudo openvpn --genkey secret /etc/openvpn/keys/ta.key
还生成:cr.pem👇
EASYRSA_CRL_DAYS=3650 ./easyrsa gen-crl

sudo cp pki/crl.pem /etc/openvpn/keys/
用于保存已吊销证书列表的 CRL 文件。revoke 是什么意思:由于您颁发了证书,因此它将一直有效,直到到期时间(默认 10 年)。所以这就像黑名单一样:你的crl.pem将保存受限制的证书列表,但不会手动生成它,检查这个提示底部的“撤销客户端”
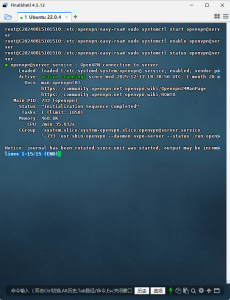
启动服务器,在 systemd 中启动和启用并设为开机自启动👇
sudo systemctl start openvpn@server

sudo systemctl enable openvpn@server
查看状态:👇
sudo systemctl status openvpn@server
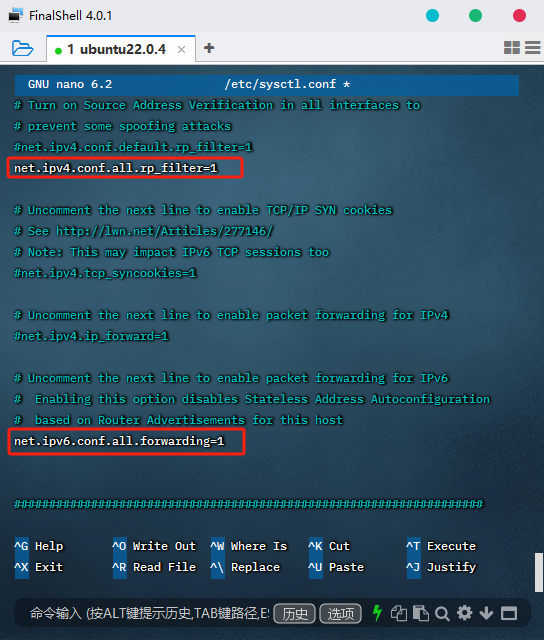
开启转发ipv4与ipv6,编辑:sysctl.conf👇
sudo nano /etc/sysctl.conf
查找 和 并将两者都设置为 1。添加或编辑这些行(很可能只是注释):net.ipv4.ip_forwardnet.ipv6.conf.all.forwarding = 1
net.ipv4.ip_forward=1
net.ipv6.conf.all.forwarding=1
保存并退出:
使配置生效:👇
sudo sysctl -p
现在,查找找到当前默认路由(网络接口)中使用的主适配器所以所有与互联网的连接都通过这个适配器完成
ip route | grep default
设置防火墙规则:nat(网络地址转换和转发规则)
编辑 UFW:
sudo nano /etc/ufw/before.rules
添加NAT表规则如下:👇
# START OPENVPN RULES
# # NAT table rules
*nat
:POSTROUTING ACCEPT [0:0]
# Allow traffic from OpenVPN client to ADAPTER enp1s0 (换成自己的适配器名称)
-A POSTROUTING -s 10.8.0.0/8 -o enp1s0(换成自己的适配器名称) -j MASQUERADE
COMMIT
# START OPENVPN RULES
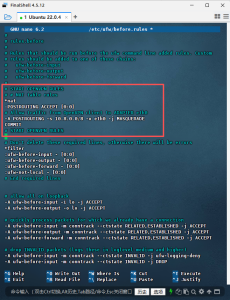
保存并退出。
为 ipv6 路由添加 MASQUERADE 规则:
nano /etc/ufw/before6.rules
添加下一个:👇
*nat
:POSTROUTING ACCEPT [0:0]
-A POSTROUTING -s 2001:db8:0:123::/64 -o ens17 -j MASQUERADE
# don't delete the 'COMMIT' line or these rules won't be processed
COMMIT
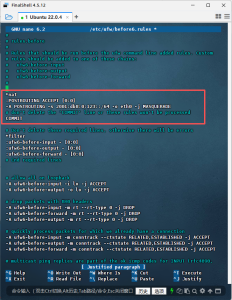
保存并退出。
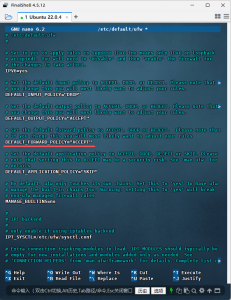
另外还要编辑:ufw
sudo nano /etc/default/ufw
查找并更改为接受DEFAULT_FORWARD_POLICY
DEFAULT_FORWARD_POLICY="ACCEPT"
现在应用 UFW 规则:
sudo ufw allow 1194/udp
sudo ufw allow OpenSSH
sudo ufw disable
sudo ufw enable
sudo ufw reload
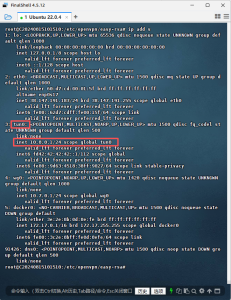
当OpenVPN服务运行时,它将创建一个隧道接口tun0;
ip add s
好了。OpenVPN服务器现已准备就绪。关于如何在 Ubuntu 22.04 上安装和配置 OpenVPN 服务器的指南结束!
下一篇文章将演示客户端配置谢谢大家!点击以下链接直达:
墙内零基础Ubuntu 22.04手搓OpenVPN搭建Pi节点实战(下:客户端连接+端口转发)(仪供学习参考) – 玫玫团队博客网